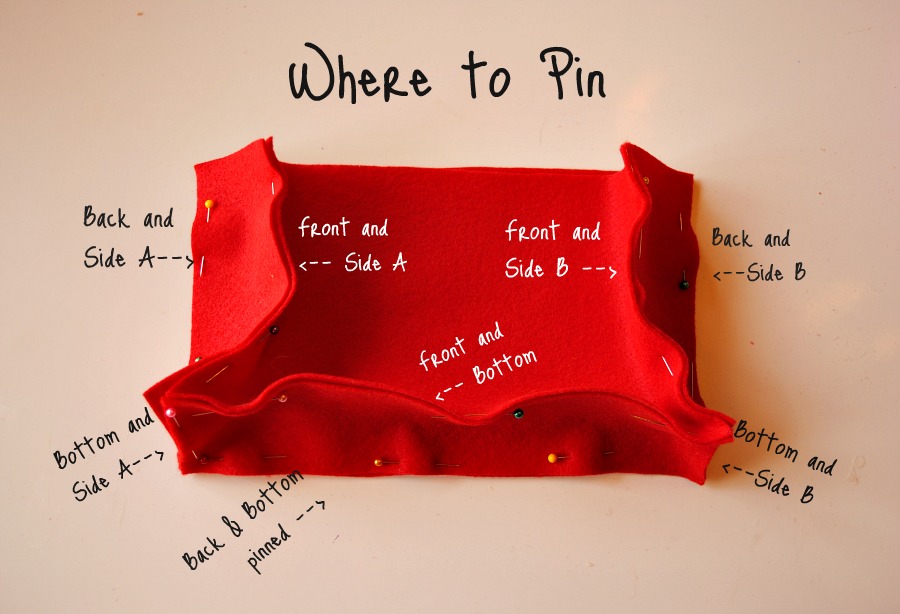
I made these "Valentine Mail Bag's" while Lilly was at school the other day! They were really easy to make and the girls have had a blast playing with them! I made both bags with 3 pieces of felt. I showed above how I cut them and then how I pinned the bags together. Once the bag was sewn together I then flipped it inside out. When the bag was flipped out the correct way I pinned the flap on so the raw edges would be on the inside. ( Sorry for lack of pictures I was trying to hurry so I could suprise Lilly with it when I picked her up after school!) The letters I cut out and pinned on the top flap and then sewed on with my sewing machine. I used scrap ribbon for the strap. The mail I cut 1 piece of felt in half and then cut the top to an angle for the flap that folds over. I then cut and pinned a little white piece for the stamp and sewed that on and then cut a little heart and sewed that on. Then I folded the the envelope in half (except the top flap of the envelop) and sewed up the sides. I wanted the flap to stick after they put there valentines in envelope so I cut a tiny peice of velcro and sewed it on. After the envelope is all sewn together I used embordery thread and stitched the black lines to look like writing! I cut out little hearts for the girls to put in their envelopes as valentines and I figured they would color pretend valentines and put them in there also! I had orginally cut out white felt to make little "letters" and was going to stitch "writing" on them like the front of the envlopes but in the end I called it good how it was and ditched that idea (too much work for something they could probabley care less about and lose anyways!). I could have put interface inside of the felt to make it stiffer but, that would have taken a lot longer and I just wanted to get it done so the girls could play with it BEFORE valentines 2012!
Showing posts with label Tutorials. Show all posts
Monday, February 6, 2012
Thursday, April 7, 2011
Raised Garden Beds!! And Polor Bears?!!
Heeeey I am soooo super excited!! I have TWO followers!!! I can not BELIVE IT!! I really am this excited, if I did not have two sleeping babies right now I would probably scream!!K. So these were super easy to make! I bought fencing post at Lowe's for $1.09 each and I used three peices of fenceing per side.So it takes 12 fence piece for one 6ft x 6ft Garden bed. For the inside support post I used scrap from down in the workshop and what I used were 2x4. So for all the wood for these bed it only cost me a little over $13.00!!! Can you beat that!!? Also really quick, when you make these beds if your going to use them to grow vegetables like I am then you want to make sure you get UNTREATED wood. You do not want the chemicals in the soil and thus in your veggies. Boooo to toxic veggies. So the wood fencing I used was untreated CEADER. Cedar is also naturally resistant to mold. Plus it looking good !Now for the wood on the inside of the bed sides, I put four post . Two of the four sides I put the outer two inside posts two inches in so everything would fit nicely together. You can also uses 4x4's for your inside corner post and then you would not have to measure the corners and you would only need four corner post instead of 8- 2x4's but what I had was 2x4's for free so that is how I did it!
I made two of each, two with the outer post two inches in and two with the outer post on the edge. The inside post I put at 19" apart. Then to make the next side i just lined up the board on the ground next to it like in the picture above and then laid the cedars on top and screwed in two screws per board. In the pic below I said" Nails"... But I meant screws. So use screws Not Nails. I had a baby crawling on me and trying to hustle while Lillys is at school!
Then I took all of the sides out in the yard and and put the sides together. See how the sides with the post 2" in are facing each other and same with the side's that have posts on the edge. I am sure I am waaaay over explain it. Then to hold it all together I held the tops of the two boards even and put the screws in on the sides where I measured in 2" for the posts so that the screws would go directly into the 2x4 that was not attached to the board. Yep I am reeeeeally bad at explain things.. I have not leveled the ground under neath it
Sooo On a cool pic note! We went to the zoo to see the polar bear!! He was so cool!! I don't know why but he was not as big as I expected buuuut I was kind of expecting him to be the size of .... I don't know maybe a elephant minus the ears.. But he keep doing this thing where he would get up on his "Ice" and dive off into the water to the bottom of the tank and push off with his feet and and kind of flip over on his back and push off the window where Lilly was standing with his hind feet !! It was really cool and kind of sad ( I say sad because it was so repetitive that it was kind of a boredom buster for him..) but definitely cool!! They also had these big keg type things in the water and he would jump off his "Ice" straight up in the air and belly flop on the kegs!! He was definitely cool and its crazy to think how close Lilly's face is to this bear, I mean only a couple of inches!!
Heres to you Nikita. For Keeping it Real.
I guess you are Kind of big ;)
Subscribe to:
Posts (Atom)